Solar Panel Mounting Accessories

Accessories Used in Solar Panel Mounting System

I. Introduction to Solar Panel Mounting Accessories

Solar Panel Mounting Accessories

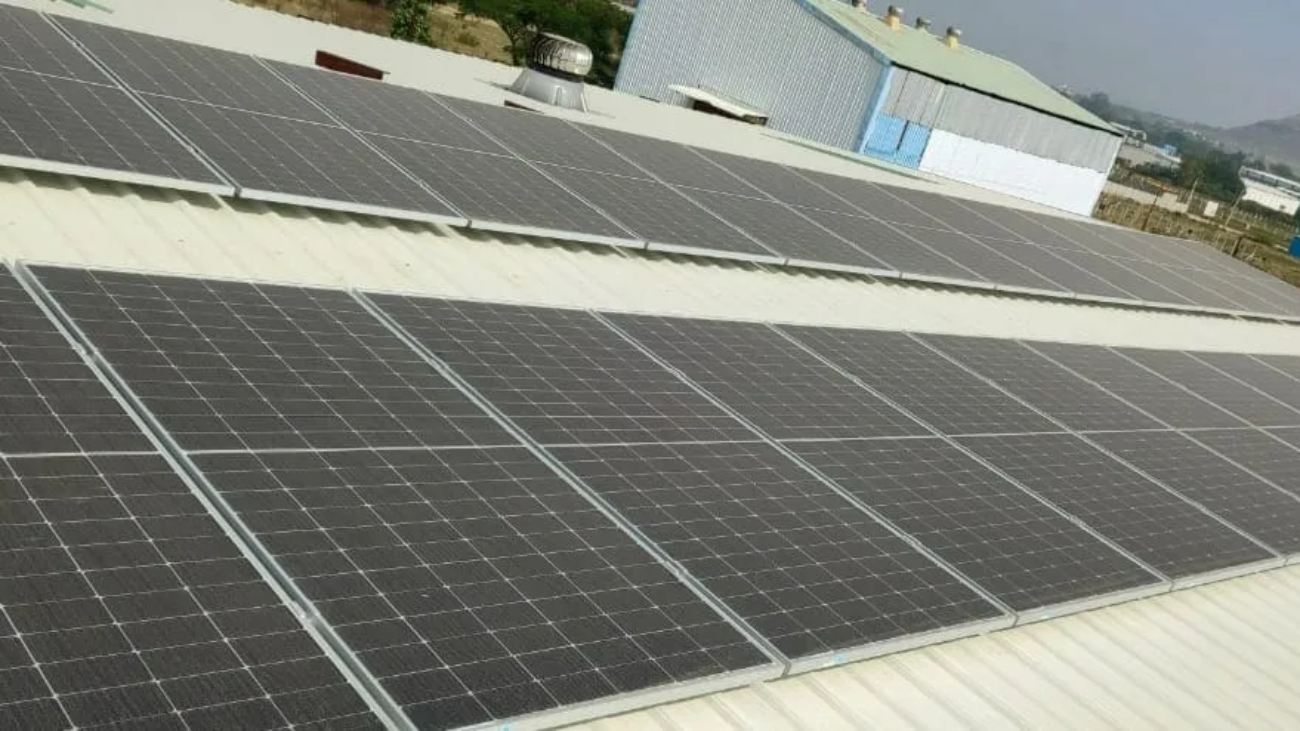
Solar panel mounting accessories are essential components of any solar panel mounting system. These accessories help securely install solar panels on rooftops, ground mounts or other surfaces.

Some key solar panel mounting accessories include:

  • Solar base plate – Provides a sturdy foundation for the solar panel structure.
  • Solar degree clamps – Allow adjusting the solar panel angle to optimize sunlight exposure.
  • End Z clamps – Attach solar panels securely to the mounting rails.
  • Middle U clamps – Hold solar panels together on mounting rails for stability.
  • Power snaps – Anti-theft clips to prevent solar panel theft.
  • Nuts and bolts – Fasten all components of the solar structure together.
  • Fastener chemicals – Bond mounting bolts to the installation surface for strength.
AccessoryPurpose
Solar base plateFoundation
Solar degree clampAngle adjustment
End Z clampPanel attachment
Middle U clampStability
Power snapSecurity
Nut/BoltStructure
Fastener chemicalStrength

These solar panel mounting accessories are made from durable materials like steel and aluminum. They can withstand tough outdoor conditions for long periods.

Using the right mounting accessories improves the safety, performance and lifespan of any solar panel installation. They provide the structural integrity needed to keep solar panels fixed securely under different wind, weather and environmental conditions.

Investing in good quality mounting accessories like spring nut-bolts, SS Allen bolts and structural fastener chemicals ensures your solar power system will function optimally for many years.

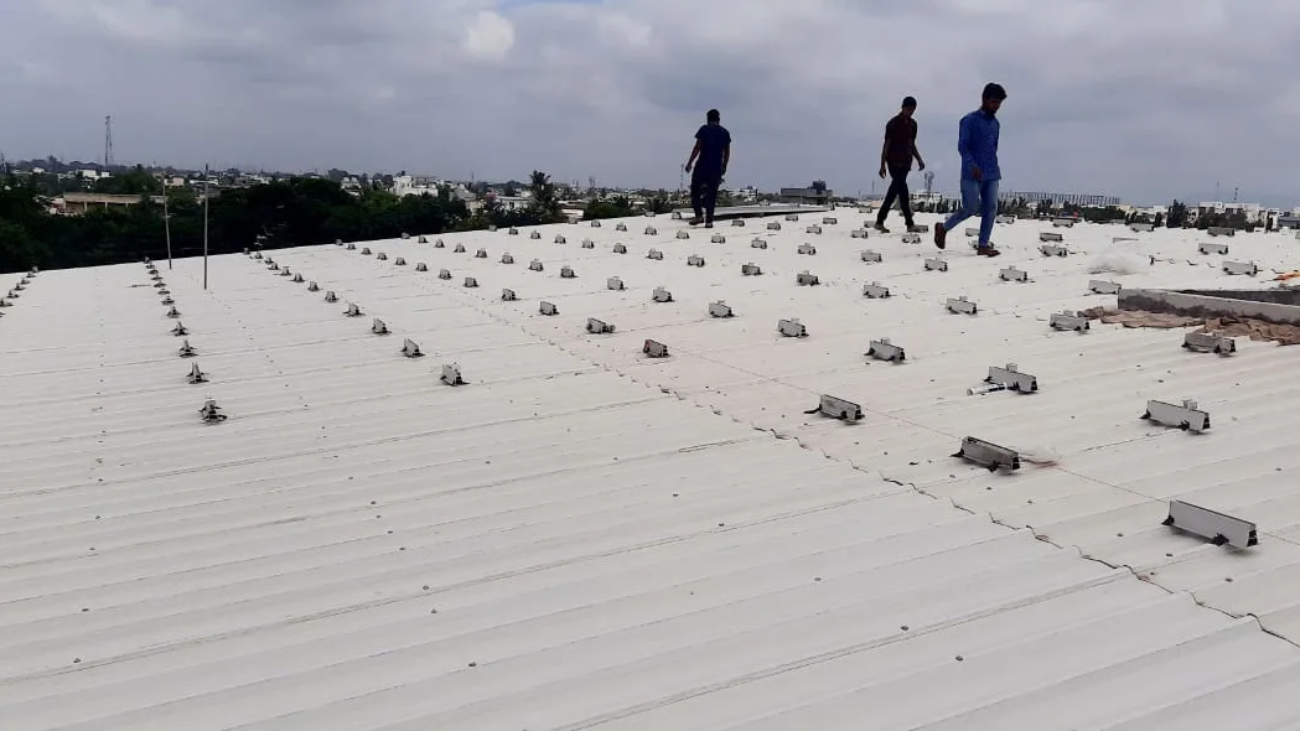
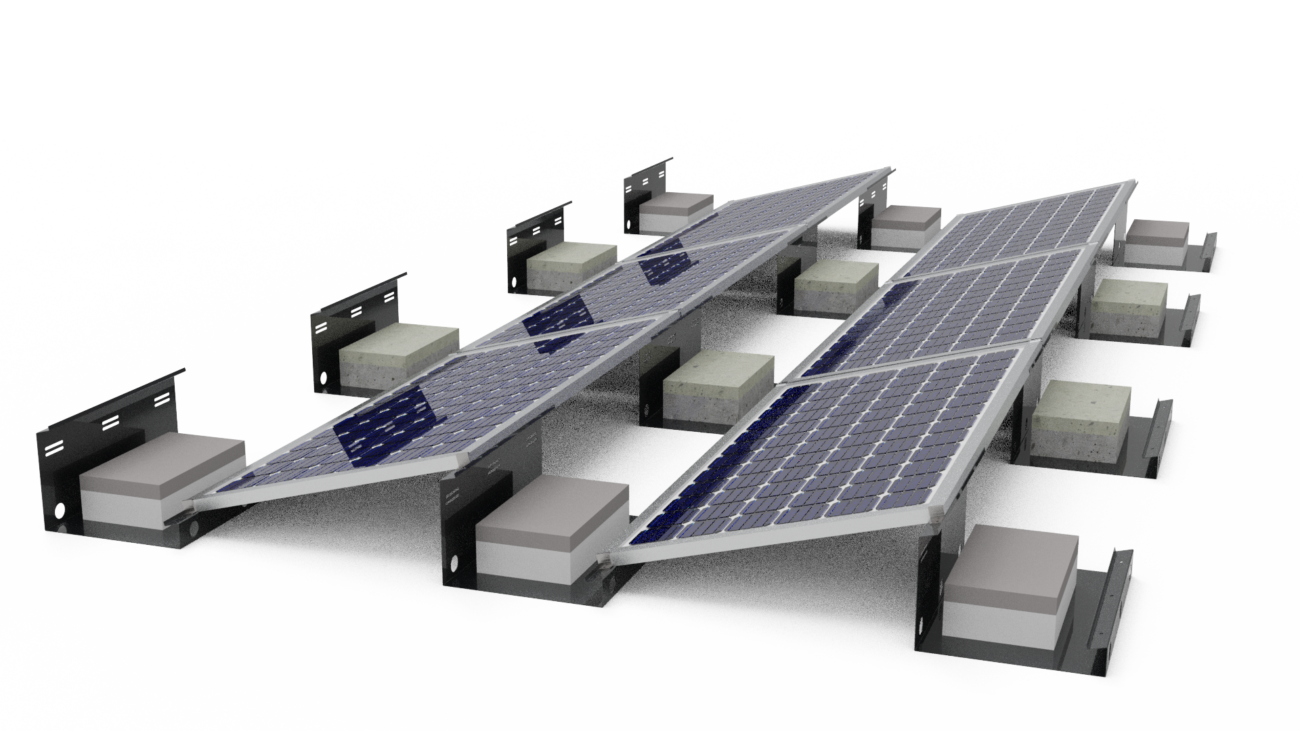
II. Solar Base Plate for Foundation

The solar base plate provides a sturdy foundation for the entire solar panel mounting structure. It is installed directly on the roof, ground or any other mounting surface.

The base plate bears the weight of solar panels, racks and other components. It must be made of durable materials like:

Base plates are available in different sizes like:

  • 41mm x 41mm
  • 80mm x 40mm

Larger solar panel installations require bigger base plates for greater load bearing capacity.

The key functions of a solar base plate are:

  • Anchor the mounting structure securely to the installation surface.
  • Resist corrosion and environmental damage.
  • Support the weight of solar panels, racks, wires etc.
  • Withstand high winds without failing.

A proper foundation is crucial for safety and performance of the solar power system. High quality base plates ensure:

  • Long term mounting structure stability.
  • Optimized energy output.
  • Reduced risk of collapse or damage.

Invest in sturdy and appropriately sized solar base plates for your installation. Proper selection and installation of base plates will maximize the lifespan of your solar panel mounting system.

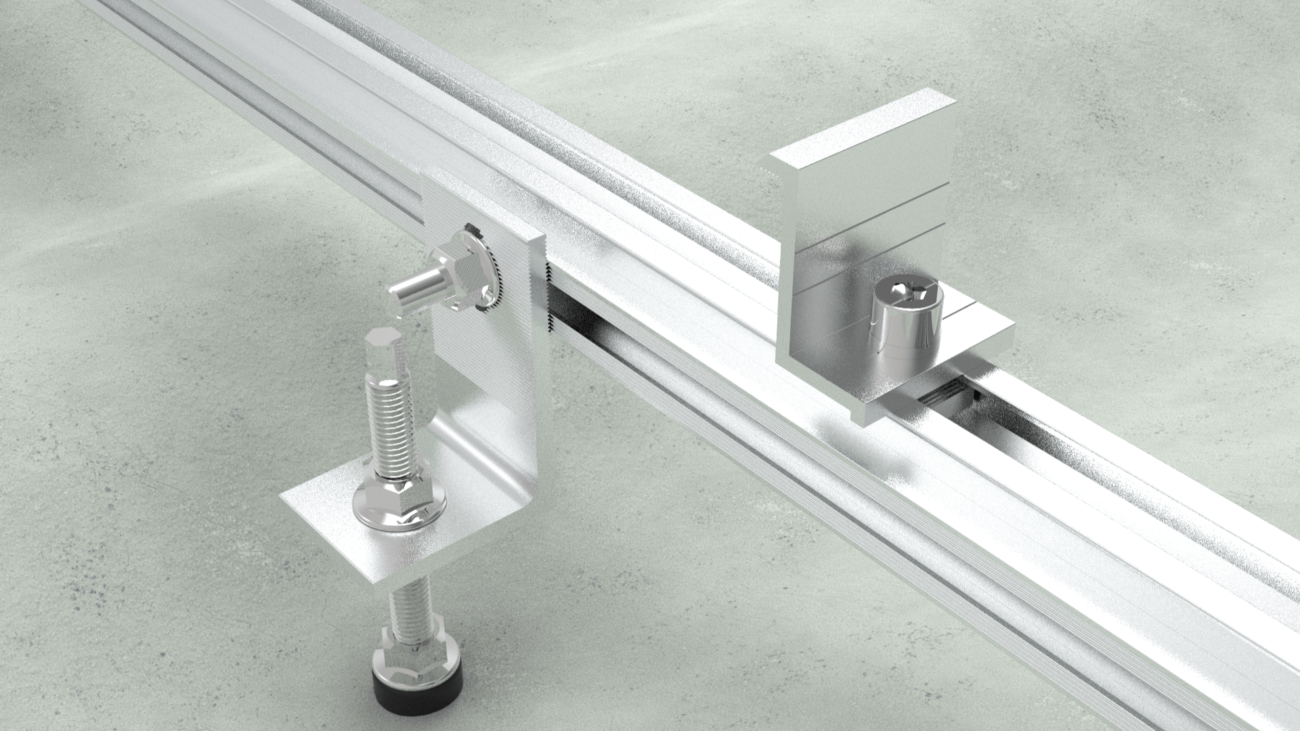
III. Solar Degree Clamps for Angle Adjustment

Solar Degree Clamps for Angle Adjustment

Solar degree clamps allow for seasonal tilt angle adjustment of the solar panels to optimize energy production.

These clamps are installed between the solar panel frames and the mounting rails. They have adjustable knobs that can tilt the panels at different angles.

Degree clamps are available in different sizes like:

  • 41mm x 41mm
  • 80mm x 40mm
  • High quality solar degree clamps are made of materials like:
  • Anodized aluminum
  • Stainless steel

Key features of degree clamps include:

  • Adjustability range of at least 45 degrees tilt.
  • Corrosion resistant construction.
  • Easy to install knob bolts.
  • Compatibility with panel frame sizes.

Proper tilt angle as per sun’s position ensures:

  • Maximum sunlight exposure on the solar panels throughout the year.
  • Optimized power output.
  • Enhanced return on investment.

Solar degree clamps must be robust enough to hold the panels steadily at the right angles. Investing in properly sized, good quality clamps will maximize energy production from your photovoltaic system.

Annual seasonal adjustment of panel angles using degree clamps improves solar electricity generation and economic viability of the installation.

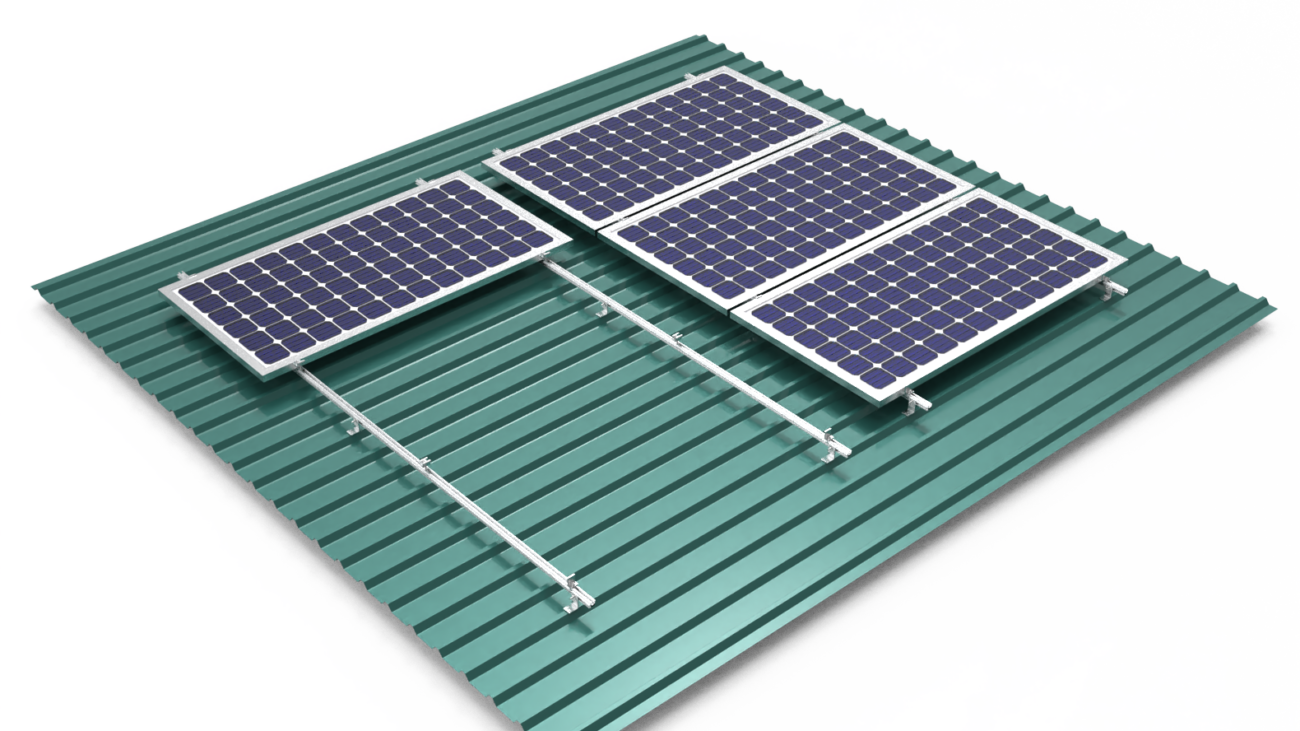
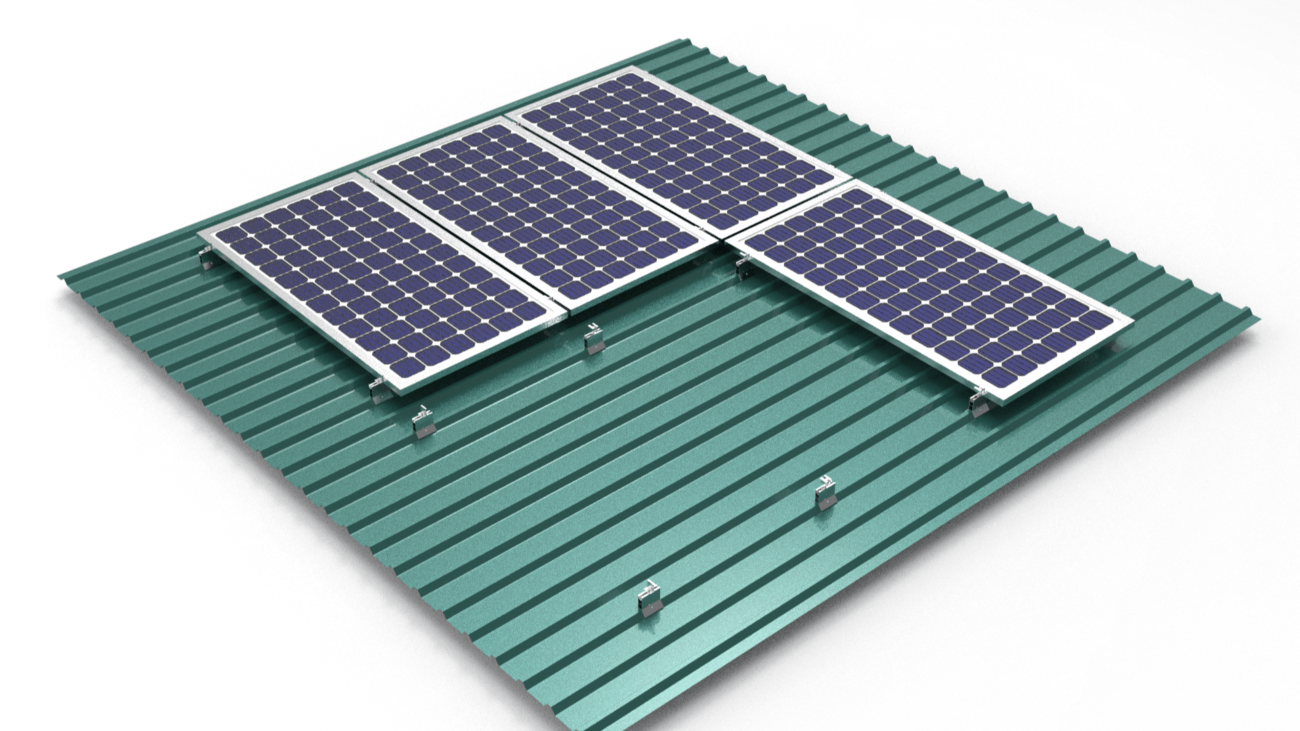
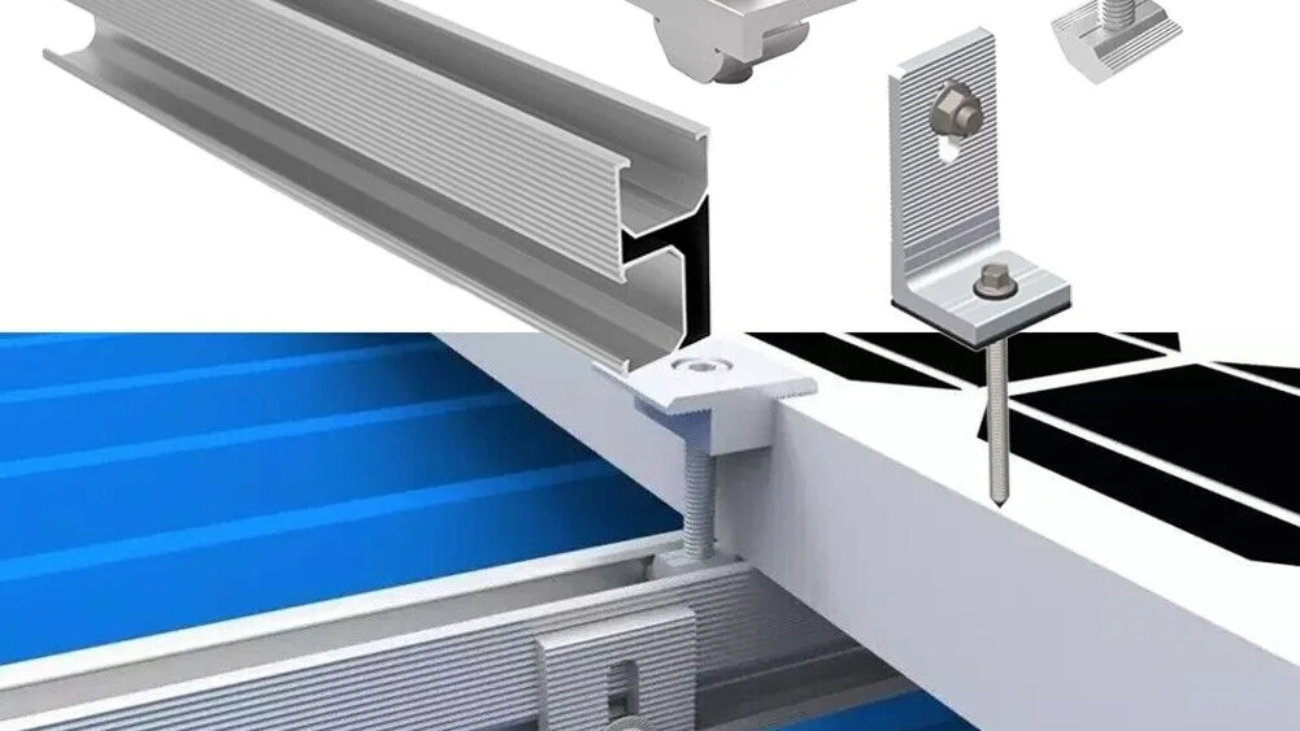
IV. End Z Clamps to Attach Panels

End Z Clamps to Attach Panels

End Z clamps are used to securely attach the solar panels to the mounting rails of the structure.

These clamps have a unique Z-shape design that tightly grips the edge of the solar panel frame on one side and the mounting rail on the other.

Key features of high quality end Z clamps include:

  • Sturdy aluminum or galvanized steel construction.
  • Weather resistant build.
  • Pre-drilled holes for easy installation.
  • Long lasting finish to prevent corrosion.

End clamps are available in various sizes to match different solar panel frame dimensions.

Benefits of using end Z clamps:

  • Provide very secure attachment of panels without gaps or loosening.
  • Allow for quick and easy panel installation.
  • Suitable for long term outdoor use.
  • Reusable if panels need rearranged.

Proper panel attachment is crucial for:

  • Optimized solar energy production.
  • Withstanding wind, rain and other weather events.
  • Preventing panel theft.
  • Ensuring long term safety and function.

Invest in good quality end Z clamps designed specifically for your solar panels. Correct installation using the right clamps will maximize the stability and lifespan of your photovoltaic system.

V. Middle U Clamps

Middle U Clamps for Stability

Middle U clamps are installed between two adjacent solar panels on the mounting rail for optimum stability.

These U clamps have a curved, rounded shape that securely grips the edges of two panels equally.

Key features of high quality middle U clamps are:

  • Durable aluminum or galvanized steel construction.
  • Corrosion resistant finish.
  • Available in various sizes to fit panel frames.
  • Pre-drilled holes for quick installation.

Benefits of using middle U clamps:

  • Prevent panels from sliding down or drifting apart.
  • Provide excellent structural support.
  • Suitable for all types of solar panel mounting structures.
  • Reusable if panel positions need adjusted.

Proper stability of the solar panels ensures:

  • Optimized energy production over time.
  • Ability to withstand weather events like storms, snow etc.
  • Long term safety and function of the system.
  • Reduced maintenance costs.

Invest in appropriately sized, high quality middle U clamps designed for your specific solar panels. Correct installation of these clamps will maximize the structural integrity and lifespan of your photovoltaic system.

Key features of power snaps:

  • Made of durable UV-resistant plastic.
  • Available in different sizes to fit rail dimensions.
  • Require no tools for installation.
  • Reusable as needed.

Benefits of power snaps:

  • Deters potential solar panel theft.
  • Provides extra peace of mind and security.
  • Suitable for all types of panel mounting structures.
  • Quick and easy to install.

VII. Nuts and Bolts for Structure

Nuts and bolts are used extensively in solar panel mounting to assemble the structural framework.

Common types include:

  • Spring nuts – Allow easy insert of bolts into drilled holes.
  • SS Allen bolts – Tighten panels and components securely.
  • Stud bolts – Attach items like junction boxes.

Benefits of using the right nuts and bolts:

  • Strong assembly of the entire mounting structure.
  • Ability to withstand weather elements like rain, wind.
  • Long term integrity and stability.
  • Reusability during the maintenance.

High quality hardware is essential for:

  • Optimized energy production over decades.
  • Reduced risk of structural failures.
  • Lower maintenance time and costs.

Choosing appropriately sized nuts and bolts made of durable materials ensures a sound framework for your solar panels. Periodic inspection and proper re-tightening preserves the stability and lifespan of the installation. Investing in good quality mounting hardware is vital for a robust and long-lasting solar power system.

VIII. Fastener Chemicals for Extra Strength

Fastener chemicals provide additional strength and stability for roof-mounted solar installations.

These adhesives are used with bolts and screws to securely bond the mounting structure to the roof surface.

The typical application process involves:

  • Drilling a hole in the roof material.
  • Injecting the chemical into the hole.
  • Inserting a bolt and allowing the adhesive to set fully.

Benefits of using fastener chemicals:

  • Create an exceptionally strong and waterproof bond.
  • Allow secure attachment to tile, metal and other roof types.
  • Compensate for weaker roof materials.
  • Resist weathering and deterioration over time.

Proper structural strength enables the solar system to:

  • Withstand extreme winds, rain and other weather events.
  • Avoid leaks, cracks and damage to the roof.
  • Maintain optimal mounting integrity for decades.

Proper installation by trained professionals ensures maximum structural reinforcement and lifespan for your roof-mounted solar system.                

Anodized Aluminum

Anodized Aluminum: Is it the Ideal Solar Panel Frame Material?

Anodized Aluminum

I. Understanding Anodized Aluminum

Anodized aluminum is an aluminum alloy that undergoes a process called anodization, in which an oxide layer forms on the surface of the metal.

Key properties of anodized aluminum include

  • Corrosion resistance
  • Strength
  • Durability
  • Light weight

The anodization process:

  • Thickens the natural oxide layer on the aluminum surface
  • Creates a transparent, hard and protective finish

The resulting surface resists:

  • Corrosion
  • Wear
  • Weathering
  • Scratching

Benefits of the anodized layer:

  • Corrosion resistance
  • Protects against oxidation, rust, staining
  • Surface hardness
  • More scratch and abrasion resistant
  • Durability
  • Withstands weathering and harsh conditions
  • Aesthetic versatility
  • Available in a range of finishes and colors

 Anodizing is an electrochemical process that creates a protective oxide layer on the surface of aluminium. This coating is highly durable, resistant to weathering, and provides excellent insulation. Anodized coatings are often used on aluminium solar mounting structures. AA10 is the common industry standard of anodized coating which is 10 microns thick.

Common applications for anodized aluminum:

ApplicationBenefits Provided
Building exteriorsCorrosion protection, strength
ElectronicsLight weight, thermal performance
Solar panel framesCorrosion resistance, strength-to-weight ratio

The anodized aluminum layer can be thinner or thicker depending on the required characteristics:

  • Hard-coat anodizing produces thicker oxide for wear resistance
  • Architectural anodizing provides corrosion protection and aesthetic options

Anodization transforms aluminum into a tougher, more durable and weather-resistant material while retaining its light weight. This makes it well-suited to applications like solar panel frames that demand corrosion resistance, strength and durability in outdoor environments. The thermal conductive properties also aid solar panel thermal performance.

II. Advantages of Anodized Aluminum Frames

Anodized aluminum frames offer several key strengths that make them an exceptional choice for solar panel installations:

Anodized Aluminum Frames

Corrosion Resistance

  • The anodized surface strongly resists corrosion, oxidation, and rust
  • Ideal for outdoor use in high humidity, coastal, industrial and other harsh environments
  • Requires very little long-term maintenance

Strength-to-Weight Ratio

  • Frames are lightweight yet highly durable
  • High strength-to-weight ratio enables stable structures without added weight
  • Easier transportation, handling and installation
  • Suitable for elevated and pole-mounted solar arrays

Aesthetic Versatility

  • Available in a diverse range of architectural finishes and colors
  • Can mimic styles like wood grain or granite
  • Blends into natural scenery or matches building exteriors
  • More aesthetically appealing than industrial-looking steel frames

Thermal Performance

  • Excellent heat dissipation properties
  • Prevents solar panels from overheating
  • Enhances efficiency and prolongs operational lifespans
  • Ideal for solar installations in hot climates

Anodized aluminum frames combine optimal corrosion resistance, strength, durability and flexibility in design to meet the demanding structural and environmental needs of solar panel systems. The exceptional thermal performance also enhances efficiency. This blend of technical and aesthetic qualities makes anodized aluminum an outstanding solar panel frame material for varied installations.

Click Here to Learn More

III. Applications

Anodized aluminum frames are extensively used in diverse solar panel installations:

Residential, Commercial and Industrial

  • Rooftop solar panels for homes, factories, offices
  • Ground or pole mounted arrays
  • Thermal properties aid efficiency

Carports and Building-Integrated

  • Vehicle and parking shade structures
  • Building facades, walls, rooftops
  • Aesthetic finishes blend seamlessly

Ground Mount and Tracking

  • Free standing arrays on ground bases
  • Solar trackers following sun movement
  • Resilience to outdoor exposure

Off-Grid Installations

  • Remote cabins and rural areas
  • Recreational vehicles and trailers
  • Resistant to vibration and shock

Sustainability

  • Recyclability makes suitable for green building

The lightweight yet durable anodized aluminum provides both structural integrity and design flexibility for solar panels across small scale residential to large commercial installations in diverse settings. It remains one of the most versatile and reliable solar infrastructure materials.

Let me know if you need any changes or elaboration on the highlighted applications. I aimed for brevity while including relevant keyword targets.

Learn More

IV. Sustainability

Anodized aluminum stands out as an eco-friendly metal used for solar panel frames due to:

Recyclability and Reduced Waste

  • Fully recyclable at end of product lifecycle
  • Recycling requires little energy
  • Reduces landfill waste
  • Conserves bauxite ore resources
  • Reusable without quality loss

Energy-Efficient Manufacturing

  • Anodizing process consumes less energy
  • Lower carbon footprint than other metals
  • Process powered by renewable electricity

Anodized aluminum is aligned with solar energy’s sustainability goals. Key properties like:

  • Corrosion resistance
  • Strength and durability
  • Thermal conductivity

Enhance lifespan, cutting replacement needs.

The combined qualities make anodized aluminum a standout green material for solar farm infrastructure. Its closed-loop recyclability and energy-efficient production supports renewable energy’s mission to reduce environmental impact.

V. Comparison to Other Frame Materials

Anodized aluminum stands out from other typical frame materials:

Galvanized Steel

  • Heavier than aluminum
  • Prone to rust and corrosion
  • Higher maintenance costs
  • Narrow aesthetic options

Stainless Steel

  • More expensive
  • Heavier than aluminum
  • Limited decorative varieties

Composite Materials

  • Durability issues in outdoor settings
  • Can delaminate over time
  • Shorter lifespan than aluminum
  • Not easily recyclable

Anodized Aluminum Advantages

  • Lightweight strength
  • Resilience to extreme weather
  • Excellent life cycle durability
  • Ability to harmonize visually
  • Sustainable properties

As a metal, anodized aluminum offers an optimal balance of strength, corrosion resistance, and recyclability – enabling more durable and eco-friendly solar panel infrastructure. Combined with flexibility in colors and textures, it remains a premium framing choice.

VI. Conclusion

Anodized aluminum stands as a top-tier solar panel framework option when key deciding factors around resilience, sustainability and aesthetics are considered.

Key properties like corrosion and abrasion resistance lend well to long-term use within hot, humid or coastal environments – while an efficient strength-to-weight ratio provides structurally sound support regardless of mounting variables across diverse solar farm, commercial building and residential settings on ground, rooftop or elevated installations.

Sustainability merits also rate highly – with superior recyclability, energy-efficient manufacturing processes and lifecycle durability that minimizes replacement needs – thus aligning well with renewable energy ideals.

Additionally, ability to colour and finish in a plethora of architectural styles empowers more seamless visual integration within different landscapes.

Compared against steel, composites and other customary building metals on vital metrics ranging from weather resilience to eco-friendliness – anodized aluminum garners excellent marks as a specialized solar panel framework, earning its classification as an optimal top choice for critical infrastructure across an array of solar energy project needs.

EPDM Rubber For Solar Mounting

EPDM Rubber for Solar Panel Mounting Structure

EPDM Rubber for Solar Panel Mounting Structure

Introduction to EPDM Rubber

EPDM (ethylene propylene diene monomer) is a type of synthetic rubber that offers excellent performance properties that make it well-suited for use in solar panel mounting applications. EPDM stands out from other rubbers due to its:

  • Durability
  • Weather resistance
  • Flexibility across a wide temperature range
  • Chemical resistance

These characteristics allow EPDM rubber to withstand outdoor environments for many years without degradation.

EPDM contains three main components:

  • Ethylene
  • Propylene
  • Diene

The diene facilitates sulfur vulcanization which enables crosslinking and gives EPDM its useful properties.

Key Properties

  • Temperature resistance: From -50°C to +150°C
  • UV radiation resistance
  • Ozone resistance

Due to its saturated polymer backbone, EPDM vastly outperforms unsaturated rubbers in terms of resisting heat, light, and environmental damage over time.

PropertyValue
Thermal expansion160 μm/(m·K)
Max temperature150°C
Min temperature-50°C

Solar Panel Mounting Applications

In solar panel mounts, EPDM is used primarily for:

  • Roof penetrations
  • Prevents water leaks
  • Protects electrical connections
  • Gasket material
  • Cushions and secures panels
  • Absorbs vibration

Its water resistance and weather resistance makes EPDM the ideal sealant and protector for roof-mounted systems in rainy climates.

With proper EPDM accessories like rubber pads and adjustable clamps, solar installers can securely mount frameless solar modules without risk of cracking thin film PV panels.

Overall, EPDM rubber offers an optimal balance of critical performance properties to safely and reliably mount photovoltaic arrays exposed to harsh outdoor conditions

II. EPDM Properties and Benefits

EPDM Properties and Benefits

EPDM rubber stands out from other rubber materials due to its exceptional weather resistance, durability, flexibility, chemical resistance and water resistance. These properties make it ideal for outdoor applications like solar panel mounting:

Weather Resistance

  • Withstands UV radiation, ozone and weathering
  • Saturated polymer backbone resists damage
  • Maintains properties after years outdoors

Durability

  • High temperature resistant up to 150°C
  • Retains strength and shape
  • Low temperature performance down to -40°C

Flexibility

  • Remains flexible in extreme cold and heat
  • Conforms to various shapes
  • Absorbs vibration and shock

Chemical Resistance

  • Resilient against acids, alkalis
  • Withstands many harsh organic solvents

Water Resistance

  • Waterproof and moisture-proof
  • Prevents leaks, flooding and corrosion
  • Protects electrical systems

These capabilities make EPDM ideal for:

  • Roof penetrations
  • Gasket material to secure panels
  • Protecting outdoor electrical connections

With its balance of critical properties, EPDM rubber is the preferred material to safely install frameless solar modules and mount PV arrays in harsh climates.

III. EPDM Applications

EPDM Applications

With its excellent weather resistance, durability and flexibility, EPDM rubber is widely used in outdoor applications that require reliable water and air sealing properties.

Key applications include:

Solar Panel Mounting

  • Roof Penetrations
  • Flashings, collars and seals
  • Prevents interior leaks
  • Gasket Material
  • Secures panels to mounts
  • Absorbs vibration
  • Protects components

Roofing Materials

  • Rubber Roofing Panels
  • Durable and waterproof
  • Resists mold and rot
  • Harnesses solar power

Accessories

  • Rubber Pads
  • Cushion clamps
  • Protect thin film PV panels
  • Module Clamp Rubber Strips
  • Secures frameless solar modules
  • Prevents glass cracking

Adjustable Clamps

  • Safely secures uneven and curved surfaces
  • Thermal expansion accommodation
  • Compatible with 5-10 mm panels

Outdoor Enclosures

  • Protects electrical boxes and gear
  • Seals out moisture, dirt and debris
  • Withstands weathering and UV rays

With EPDM’s balanced material properties, it serves critical sealing, mounting and protection functions across countless outdoor applications.

IV. EPDM in Outdoor Environments

EPDM’s exceptional resistance to heat, sunlight and environmental degradation makes it an ideal rubber material for permanent outdoor installation.

Temperature Resistance

  • Withstands high temperatures up to 150°C
  • Retains flexibility at low temperatures down to -50°C
  • Handles extreme weather fluctuations

UV Resistance

  • Specialized polymer backbone resists UV radiation
  • Prevents material degradation
  • Provides decades of exposure resistance

Ozone Resistance

  • Additives block ozone degradation
  • Prevents cracking and hardening
  • Extends service life

Weathering Resistance

  • Stands up to years of rain, sun and snow
  • Retains a like-new appearance
  • No visible signs of aging

Service Lifespan

  • Properly formulated EPDM lasts for decades
  • Far exceeds the capability of other rubbers
  • Reduces the need for replacement

These capabilities make EPDM the preferred choice for:

  • Roof seals
  • Solar panel mounts
  • Outdoor gaskets and seals
  • Protecting components in harsh environments

EPDM rubber delivers reliable, long-lasting performance in even the most punishing outdoor installation environments.

V. EPDM in Solar Panel Mounting

EPDM’s exceptional durability and weather resistance makes it an ideal material for solar panel mounting applications.

Key Uses

  • Roof Penetrations
  • Flashings and seals
  • Prevent leaks
  • Gasket Material
  • Cushion and secure panels
  • Absorb vibration

Solar Mounting Accessories

  • Rubber Pads
  • Protect thin film PV panels
  • Cushion adjustable clamps
  • Module Clamp Rubber Strips
  • Secure frameless solar modules
  • Prevent glass cracking

Benefits

  • Waterproof and moisture-proof
  • Accommodates expansion and contraction
  • Electrically insulating
  • Resilient shock absorption

Adjustable Clamps

  • Secure uneven and curved surfaces
  • Compatible with 5-10 mm panels
  • EPDM pads protect glass

Frameless Mounting

  • Secure mounting without frames
  • Rubber pads prevent damage
  • Clamp securely without slipping

With its durability and sealing capability, EPDM rubber makes an ideal accessory material for safely and reliably mounting solar arrays on rooftops and carports while protecting them from weather events and mechanical stresses.

Click Here to Learn More

VI. EPDM Accessories

EPDM’s flexibility and durability make it an ideal material for accessories used to safely mount solar panels. Key accessories include:

Rubber Pads

  • Cushion and protect panels
  • Place inside clamps
  • Prevent glass damage
  • Available thicknesses:
  • 5mm
  • 10mm
  • 15mm

Module Clamp Strips

  • Created from extruded EPDM strips
  • Protect frameless panel edges
  • Offer cushioning and grip
  • Lengths:
  • 8cm
  • 12cm
  • 15cm

Adjustable Clamps

  • Flashed aluminum clamps
  • EPDM rubber inserts
  • Secure uneven shapes
  • Grip 5-10mm panels

Flashing Seals

  • Seals roof penetrations
  • Split EPDM boot design
  • Prevents leaks
  • Reusable and adjustable

Specialty Gaskets

  • Seals electrical boxes
  • Moisture and dust protection
  • Custom shapes available

With its sealing properties and flexibility, EPDM enables solar installers to safely secure panels and protect components from weather and mechanical damage.

Conclusion

EPDM rubber offers an unmatched balance of properties that make it the ideal material for solar mounting applications. Key advantages include:

  • Weather resistance – Withstands decades of UV, ozone, rain, snow and temperature extremes
  • Durability – Retains properties after years of outdoor stress
  • Flexibility – Remains flexible across a wide temp range
  • Waterproof – Prevents leaks and flooding
  • Chemical resistance – Withstands environmental pollutants
  • Solar Mounting Uses:
  • Roof penetrations – Flashings, seals and gaskets
  • Gasket material – Secures panels, absorbs vibration
  • Rubber pads – Inside adjustable clamps to protect glass
  • Module clamp strips – Secures frameless solar modules

Out of all available rubber materials, properly formulated EPDM delivers the best assurance for long-term performance and reliability in the harshest outdoor environments.

With UV stabilizers and antioxidants, modern EPDM formulations resist degradation from heat, light and ozone for decades. Paired with adjustable clamps and compression seals, solar installers can securely mount PV arrays in all climates knowing the rubber gaskets will continue providing protection against the elements throughout the system lifetime.

EPDM rubber stands above other materials as the ideal choice for safely securing roof-mounted solar panel installations.

Solar Project Construction Costs Efficiency

8 Ways to Slash Solar Project Construction Costs Efficiency

 Solar Project Construction Costs Efficiency

I. Select the Right Land

Select the Right Land

Choosing the right piece of land is a critical first step to lower solar construction costs. The land has certain requirements and criteria that must be met before building a solar project on it, covering factors like:

  • Topography and terrain
  • Electrical infrastructure access
  • Wildlife impact

The land should ideally be:

  • Reasonably cleared and level
  • Within 1-3 miles of a substation
  • Within 1 mile of a three-phase power line

It’s important not to rush into leasing land only based on an attractive price. Being selective about your future solar site may cost more upfront and involve competition with other solar developers, but the wrong land could raise financial implications later on.

For example:

  • Contaminated lands bring liability and regulatory issues
  • Prolonged construction time and higher costs

Conducting site evaluations with a geotechnical investigation plan helps mitigate risk:

Site Condition EvaluationsImportance
Slope stability analysisEnsures proper foundation design
Sediment control testingInforms storm water management system
Subgrade examinationsVerifies adequate ground bearing pressure

Being selective about your solar land site may cost more upfront, but saves money in the long run by preventing avoidable construction issues. Analyse the size, shape, and terrain to determine if the land meets critical criteria. Don’t rush into a land lease solely based on an attractive price.

Click Here to Learn More

II. Let the Land Inform Design

Once you have secured the right land, conduct thorough site evaluations to inform the solar project design. This helps reduce unexpected issues arising during construction that add costs. Key steps include:

Geotechnical Investigations

Perform detailed geotechnical studies of the site including:

  • Slope stability analysis
  • Soil corrosivity measurements
  • Identifying soil bearing pressure and capacities

This data helps determine:

  • Proper foundation dimensions
  • Appropriate ground preparation
  • Necessary sediment erosion controls

Having accurate geotechnical inputs prevents under-engineering foundations that fail or over-building that wastes money.

Racking and Mounting Design

Racking and Mounting Design

The site’s soil and terrain conditions should also guide designing the solar racking system:

  • Account for slope, load capacities and wind shear
  • Ensure proper anchor sizing and embedment depths

Carefully matched racking avoids unnecessary costs from:

  • Insufficiently anchored structures failing in high loads
  • Oversized racking increasing materials, construction and land use

Storm Water Management Evaluation

Preventing runoff and erosion problems during construction protects water quality and avoids costly mitigation.

In sum, informed solar design optimized for the site’s unique properties saves money during builds and over asset life cycles.

III. Choose Reliable Equipment

Selecting durable, high-performing equipment suited for the solar project can help efficiently meet construction targets and budgets. Best practices include:

Vendor Evaluation

Thoroughly assess potential vendors and suppliers on:

  • Product quality and durability
  • Warranties and maintenance terms
  • Past performance meeting specifications

This reduces unexpected costs from fixes or change orders.

Specification Setting

Clearly define project performance requirements and operating conditions including:

  • Weather resilience testing (wind, humidity, temperatures)
  • Critical load capacities and safety factors
  • Compliance with all applicable standards

Equipment unable to meet specifications can slow progress or require replacements.

Testing and Inspection

Validate equipment condition and capabilities through:

  • Performance verification testing
  • Quality control inspections at factories and upon delivery
  • Operational trial runs before full deployment

This prevents integrating defective components into builds.

Preventative Maintenance

Follow all manufacturer recommended upkeep like:

  • Component lubrication and cleaning
  • Tightening loose connections
  • Tuning and calibration

Proactively caring for equipment prevents breakdowns or failures that are more disruptive to fix during active construction.

Choosing robust, durable equipment tailored to the project’s specific demands increases construction efficiency and asset longevity while lowering lifetime equipment costs.

IV. Simplify Racking Installation

Streamlining the solar racking installation process through thoughtful design and planning cuts costs by maximizing efficiency. Useful techniques include:

Adjustable Components

Specify racking with some flexibility to accommodate variability in site conditions like:

  • Slope grade changes
  • Subtle foundation shifts
  • Minor anchor position adjustments

This avoids expensive time delays from disassembly or holes requiring re-drilling.

Installation Work Plans

Create detailed work plans mapping the sequential process including:

  • Equipment and tool requirements
  • Labour needs and assignments
  • Anticipated production rates

Thorough plans allow coordinating teams and deliveries for smooth flows, preventing downtime from missing items.

Streamlined Hardware

Prioritize racking using simplified components like:

  • Universal clamps fitting multiple module types
  • Single bolt designs
  • Integrated ground bonds

Simpler assemblies with fewer unique parts quicken overall mounting.

Specialized Equipment

Leverage purpose-built tools for efficiency gains on repetitive tasks like:

  • Auto-dispensing auger rigs for drilling pile foundations
  • Custom jigs ensuring consistent positioning
  • Lifting aids for positioning sections

The right equipment prevents injury and enhances productivity.

Careful coordination, adjustable parts allowing adaption, and streamlined installations prevent complications that sap field productivity – saving costs with efficient solar racking assembly.

V. Control Construction Budget

Carefully managing the construction budget helps avoid cost overruns that erode project returns. Best practices include:

Early Cost Estimation

Develop initial budgets during early planning using expected:

  • Equipment, material, and labour expenses
  • Permitting, grid connection, and inspection fees
  • Site preparation and installation costs
  • Lease payments

Regularly update these projections with real quotes as specifics firm up.

Risk Assessment

Proactively evaluate uncertainties that may impact costs like:

  • Inclement weather delays
  • Potential supply chain disruptions
  • Changes in material pricing
  • Community complaints

Identify mitigations to contain budgets despite issues.

Contingency Funds

Incorporate 5-10% contingencies within budget estimates for the inevitable unplanned events on large builds. This prevents scrambling to fund surprises.

Value Engineering

Continuously identity ways to trim costs like:

  • Sourcing substitute materials
  • Simplifying designs
  • Using more efficient construction techniques

Savings from value engineering provide additional buffers.

Change Control

Carefully evaluate any project changes for cost/benefit before approval to prevent scope creep.

Ongoing cost oversight, planning for uncertainties, and continuous optimization prevents overspending, keeping solar projects economically viable.

VI. Account for Soft Costs

“Soft costs” like permitting, financing, and labour add up. Strategies to control these expenses include:

Streamlined Permitting

  • Research local solar ordinances in detail
  • Prepare thorough permit packages
  • Use expediters to ease process

Understanding requirements and properly completed submissions prevent delays from application issues.

Efficient Procurement

  • Comparison shop equipment and materials
  • Leverage online supply marketplaces
  • Optimize logistics like shipping modes

Casting a wide net surfaces best pricing and responsiveness.

Labour Optimization

  • Cross-train workers on multiple tasks
  • Use crews balancing experience levels
  • Incentivize on-time delivery

Flexible, motivated crews prevent downtime and inefficiencies.

Strategic Sourcing

  • Buy cables, connectors in bulk
  • Seek winter off-season discounts
  • Favour modular components

Order consolidation and tactical timing reduce supply chain expenses.

While some soft costs are fixed, focus on streamlining variable expenses.

Cost Containment Strategies

AreaSavings Approach
PermittingSubmit complete packages
ProcurementLeverage marketplaces
LabourReward on-time work
SourcingBuy at scale in off-seasons

Get ahead of soft costs early in planning to protect project profitability.

VII. Assemble Experienced Team

The right solar project team is crucial for on-time, on-budget delivery. Best practices for assembly include:

Diverse Expertise

Staff key roles with experts in areas like:

  • Solar design engineering
  • Procurement and supply chain
  • Project planning and controls
  • Grid integration and commissioning

This breadth covers the multifaceted competencies vital for success.

Proven Track Records

Validate capabilities by examining:

  • Years in industry
  • Projects successfully delivered
  • Client references
  • Safety and performance metrics

This reduces risk of underperforming personnel sinking progress.

Aligned Incentives

Structure contracts promoting shared project success through:

  • Bonuses for schedule and budget achievement
  • Penalties for missteps
  • Profit sharing

Incentive alignment prevents finger pointing during crunch times.

Scalable Resourcing

Ensure capacity to flex expert personnel levels up and down as activity fluctuates during project phases. This cost-effectively right-sizes labour.

Responsiveness Training

Conduct emergency response simulations preparing crews to smoothly handle incidents like storms or injuries if they arise with minimal safety and cost impacts.

Investing in the right expertise, experience, motivation and responsiveness in a solar build team pays dividends through maximized efficiency and risk reduction over the project lifecycle.

VIII. Prepare Contingency Funds

Despite best-laid plans, unexpected events during solar construction add costs. Maintaining contingency funds mitigates overruns threatening project viability. Best practices include:

Historical Spending Analysis

Examine past projects to estimate emergency cost frequencies in areas like:

  • Permitting delays
  • Weather downtime
  • Equipment failures
  • Materials pricing changes

These insights quantify contingency targets.

Probability Impact Matrices

Map identified risk events by likelihood and potential cost severity to prioritize responses and gauge required reserves.

RiskHigh LikelihoodLow Likelihood
High CostPermit denialsFoundation redesigns
Low CostInspectionsMinor repairs

Ongoing Reassessment

Re-evaluate required contingency amounts and probability estimates at major milestones as uncertainties resolve over the project timeline.

Contingency Tracking

Implement formal change control processes ensuring contingency funds only applied to eligible unforeseen costs rather than scope expansions.

Proactively earmarking reserves for the inevitable unknowns, continually refining estimates, and tightly controlling drawdowns ensures access to emergency funding without tapping capital required for planned activities. Sized correctly, contingencies become insurance policies enabling construction progress despite surprises.

Hanger Bolt Solar Mounting System

Hanger Bolt Solar Mounting System

Hanger Bolt Solar Mounting System

 I. Introduction

Hanger bolts are an essential component of solar mounting systems installed on rooftops. They serve as the structural attachment between the solar panels and the roof surface.

Hanger bolts consist of:

  • A threaded bolt
  • Collar nuts and washers
  • An EPDM rubber grommet seal
  • A mounting plate with a slot

They are made of durable stainless steel and aluminum.

The key characteristics of hanger bolts include:

FeatureDescription
AdjustabilityOffer variable lengths and angles to mount panels
Structural integrityWithstand wind, weather and meet building codes
Watertight sealingRubber gasket protects roof from leaks
Solar Mounting Hanger Bolt Systems

Hanger bolt kits contain all the fittings needed for a complete solar panel installation:

  • Hanger screws
  • Mounting rails
  • Mid/end clamps

We provide a secure and user-friendly mounting system with professionals and DIY installers.

When paired with compatible solar racks and rails, hanger bolt sets enable angled or flat installations on various roof types like singles, tiles, and metal roofing profiles.

By elevating and securely fastening solar modules, hanger bolts play a critical role in durable and high-performing rooftop solar energy systems. Their adjustable nature allows for tailored positioning to maximize solar capture potential.

II. Components

Hanger bolt solar mounting systems comprise three main components that work together:

Hanger Bolts

Hanger bolts

Hanger bolts are the metal fasteners that attach solar panels and rails to the roof structure. Key features include:

  • Threaded stainless steel shaft
  • EPDM rubber grommets for water sealing
  • Flange nuts to secure installation
  • Lengths ranging from 7″ to 10″

The function as adjustable “hangers” on the roof to position and elevate PV modules at the optimal tilt and angle. The bolt inserts into a pre-drilled hole in the roof while the gasket provides a tight, weather tight connection protecting roof layers underneath.

Adapter/Mounting Plates

Adapter Plates

These square adapter plates act as the intermediary between the hanger bolt and solar rail system:

  • Made of stainless steel/aluminum
  • Slotted holes for adjustability
  • Locks into hanger bolt teeth

The plate height is adjustable on the hanger bolt to achieve proper rail height before being locked into place with collar nuts. This flexibility facilitates customized positioning.

Roof Attachments

Roof Attachments

On the underside of the roof, these pieces distribute structural loads:

  • Washers
  • Support plates with bolt holes
  • Solid blocking within roof framing

The arrangement securely anchors the system while protecting roofing materials from excessive loads. This allows the solar panels’ weight to transfer safely from the rails through the hanger bolts into the roof framing via these supportive attachments.

Combined together, these three modular solar mounting system components provide robust structural capabilities for rooftop solar installations.

Click Here to Learn More

III. Features and Benefits

Hanger bolt solar mounting kits offer installers and homeowners the following advantageous features and benefits:

Adjustability

  • Variable bolt lengths from 150″ to 250″
  • Changeable plate heights on the threaded shaft
  • Accommodate various roof angles and tilts
  • Allow precise positioning of solar modules

This adjustability enables customized installations for maximum sun exposure, output, and performance.

Durability

  • Stainless steel and aluminium resist corrosion
  • Withstand decades of outdoor/weather exposure
  • Rubber gaskets maintain watertight roof seal
  • Strong structural connections avoid component failures

The robust metals and secure assembly remain intact for the system’s lifetime, despite snow, wind, rain, UV radiation and temperature swings.

Ease of Installation

  • Pre-assembled parts
  • Single drilled roof hole per hanger
  • Bolt directly into roof structure
  • Align plates and rails + tighten into place

The simplified install process reduces labour time and costs compared to alternative attachment methods. No welding or extensive rail alignment needed.

In summary, this customizable, heavy-duty, and DIY-friendly mounting system maximizes the ROI of rooftop solar installations.

IV. Compatibility

Hanger bolt solar mounting systems are compatible with a wide range of roof types and solar panels.

Roof Types

Hanger bolts can secure solar installations onto any common roofing material:

  • Asphalt shingles
  • Concrete or clay tiles
  • Metal panels and roofing profiles
  • Corrugated
  • Standing seam
  • Ribmmed
  • Low slope commercial roofs

On tilted roofs, hanger bolts are installed into roof framing rafters or trusses. On flat roofs, concrete blocks anchor the bolts.

EPDM gaskets form tight yet movable seals to accommodate shifting and expansion of roof decks. This protects roof coverings from moisture damage.

Solar Panels

Hanger mounting components work with all major PV panel technologies:

  • Monocrystalline
  • Polycrystalline
  • Thin-film flexible

Systems are designed for longevity to match 30+ year lifespans of solar modules.

Aluminium/steel rails a nd mid/end clamps further ensure universal compatibility – securely holding panels of varying widths and frame types.

No matter the roof covering or solar collection system, hanger bolt sets facilitate adjustable and code-compliant installations. Their versatility makes them widely trusted among installers.

V. Installation Process

Installing a hanger bolt solar mounting system involves a straightforward sequence of steps:

Tools Needed

  • Cordless drill
  • Torque wrench
  • Wrenches for bolt tightening
  • Marking pencil

Steps

  • Measure and mark pre-drilled holes for hanger placement based on panel layout.
  • Insert hanger bolt through roof into rafter and tighten flange nut.
  • Add washers and collars to secure in place while allowing bolt to rotate.
  • Rotate bolt to desired tilt angle.
  • Slide adapter plate onto threaded shaft with slot facing outward.
  • Adjust plate to required rail height and tighten collars with torque wrench.
  • Secure aluminum mounting rails atop plates, inserting splices to extend.
  • Attach mid/end roof clamps and mount solar panels using manufacturer instructions.

This straight-forward installation sequence allows for rapid solar panel mounting while leaving room for full angle and height adjustment.

It’s an easy DIY project for homeowners or professionals alike, made simpler through the hanger bolt system’s user-friendly and pre-assembled parts. Proper torque levels still need adherence to for lasting safety and security.

VI. Performance

Once installed, hanger bolt solar mounting kits deliver exceptional performance and reliability:

Stability

  • Withstand wind uplift up to 120 mph
  • Resist seismic and dynamic loads
  • High shear and pull-out strength

Structural aluminium components and direct roof framing attachments provide robust wind resistance and code compliance.

Weather Resistance

  • Metal parts resist corrosion and oxidation
  • Rubber seals block water infiltration
  • Unaffected by temperature swings, UV rays

Durable metals and gaskets withstand decades of snow, rain, heat and sun exposure.

Waterproofing

  • EPDM washers hug roof surface
  • Allow proper roof drainage flow
  • Protect structural sheathing from leaks

Rubber bushings accommodate shifting while maintaining a watertight connection to underlying roof layers.

In terms of wind/code ratings, all-weather endurance, and moisture protection – hanger bolt framing delivers reliable, top-tier performance year after year. Homeowners gain peace of mind from their investment while collectors benefit from secure solar module support.

VII. Conclusion

The hanger bolt solutions offer a premier solar mounting method that maximizes value for homeowners and installers alike.

Affordability

  • Cost-effective hardware
  • Straightforward DIY install
  • Scalable to any budget

These money-saving features make solar power achievable for most homeowners compared to high-cost racking alternatives.

Aesthetics

  • Low profile mounting
  • Clean, simple design
  • Maintains roofline appearance

Visually appealing, non-invasive placement preserves existing architecture and curb appeal.

Reliability

  • Robust metals resist corrosion
  • Watertight fit guards against leaks
  • Secure stability in storms

Durable components withstand decades of climatic exposure, avoiding failures or repairs.

With streamlined affordability and upkeep combined with strength, adaptability and aesthetic appeal – hanger bolt systems unlock rooftop solar full potential. Their user-friendly nature allows households at all income levels to meet renewable energy goals while adding beauty and resilience.

Mounting Systems

Mounting Support Systems (Support Largest Sizes of Solar Panels)

Mounting Systems Support

I. Introduction to Mounting Support System

As solar panels continue to increase in size and output capacity, mounting support systems must evolve to the larger panel dimensions. Our mounting solutions for both pitched and flat roofs are specially designed to accommodate very large solar panels exceeding 2m in length.

With our modular, adjustable mounting systems, there are no limitations on the dimensions of solar panels that can be installed. Some key benefits include:

  • Support for solar panel sizes up to 2320mm x 1200mm through extended mounting rails and optimized mounting hole positions
  • Ability to handle the increased panel load from larger panels through strengthened panel frames and additional support options
  • Flexible panel orientation between landscape or portrait configurations for ideal solar exposure

Below is an overview of our flagship mounting systems and their capabilities for larger solar installation:

With minimal adjustments, our mounting solutions allow the installation of higher capacity solar panels on both residential and commercial projects. By accommodating larger panel dimensions, we enable installers to maximize energy generation and return on investment.

Contact our team today to learn how our mounting systems can meet your needs for increased panel sizes and optimized solar output.

II. Mounting Support Systems for Pitched and Flat Roofs

Mounting Systems for Pitched and Flat Roofs

We offer dedicated mounting solutions for pitched and flat roof types to securely install solar panels of any size:

Structura for Flat Roofs

The Structura mounting system for flat roofs has been expanded to support larger panel dimensions:

  • Extra longer back plates and mass carriers
  • Redesigned mounting holes for greater adjustability
  • Handles solar panels up to 2320mm in length Structura Pitched for Pitched Roofs

Click Here to Learn More

Our Structura Pitched mounting system features:

  • New extended Side++ profiles in longer lengths
  • No cutting or extensions needed
  • Supports solar panel widths up to 1052mm

By eliminating any width restrictions, Structura mounting support system Pitched allows full utilization of available roof space for pitched residential installations.

Structura mounting support system Pitched are engineered to handle increased panel load from large panels. Their flexible, adjustable designs ensure a secure mount and simple installation of oversized solar panels.

Contact us today to determine which roof-specific mounting system is best suited for your project and panel dimensions.

III. Accommodating Large Panel Dimensions

Our modular, adjustable design, and mounting systems can easily accommodate oversized solar panels exceeding 2m in length or 1m in width.

Modular Components

With interchangeable mounting rails, clamps, and anchors, we can customize the:

  • Spacing between panels
  • Distance from roof edge
  • Panel orientation (landscape vs portrait)

This flexibility allows us to tailor the system to the exact panel dimensions and optimize energy generation.

Adjustability

Our mounting rails feature variable mounting help the positions to fine-tune panel placement. By adjusting:

  • Mounting height
  • Tilt angle
  • Position along the rail

We can achieve the ideal panel alignment for maximum solar exposure.

For east-west installations, wider centre distances between 2500-3000mm enable even wider solar panels to be installed in excess of 1200mm.

With minimal adjustments, our mounting systems can securely hold solar panels of any length, width or output capacity. Contact us to build a custom solar mounting solution tailored to your oversized panels.

IV. Managing Panel Load

With solar panels increasing in size, the total panel load from wind and snow also rises. Our mounting systems are engineered to handle these high load conditions.

Calculating Panel Load

We thoroughly analysis expected wind and snow loads based on:

  • Panel surface area
  • Installation location
  • Roof height

This allows us to determine the total forces exerted on the solar panel.

Panel Strength Evaluation

We then evaluate whether the panel structure requires additional reinforcement by:

  • Comparing total load to the panel’s maximum rating
  • Considering panel frame, support ribs, and glass strength

Strengthening Options

If needed, we can reinforce the installation through:

  • Additional mounting points
  • Shorter span between rails
  • Switching panel orientation from landscape to portrait

Reinforcement eliminates deflection and firmly secures panels even under heavy snow accumulation or extreme wind speeds.

By carefully evaluating and addressing panel load, we ensure the structural stability, safety, and longevity of large solar installations. Contact us today to analyse your specific site conditions and panel loading.

V. Factors Influencing Panel Output

While solar panel size is important, there are other key factors that impact energy generation:

Panel Structure and Materials

  • Monocrystalline panels are the most efficient but expensive option
  • Polycrystalline panels are moderately efficient and affordable
  • Thin-film panels are cheaper but require more surface area

Higher efficiency panel materials produce more energy from the same amount of sunlight.

Available Roof Space

  • Carefully measure usable roof sections at optimal angles
  • Consider shading from trees, chimneys, and other obstacles

More roof space allows the installation of more and/or larger solar panels.

Solar Irradiance and Climate

  • Sunlight duration and intensity varies by location
  • Energy demands fluctuate with seasons and weather

Areas with more annual sunlight and temperate climates will generate more solar energy.

While panel size contributes, many other factors influence total energy output. Our experts can help analyze all these variables to design the optimal system for your needs and maximize return on investment.

VI. Determining System Size

Properly sizing your solar system is crucial to meet your energy needs and maximize savings.

Calculate Energy Usage

  • Review 12 months of utility bills to determine average monthly kWh consumption
  • account for future needs like electric vehicles
  • Buy enough panels to cover 100% of usage to eliminate electric bills

Choose Number of Panels

  • Calculate the kWh output of each panel based on its wattage rating
  • Divide total energy needs by per-panel production
  • Size the system to produce excess energy if possible

Consider Electricity Needs

  • Will grid power be used as a backup or be eliminated completely?
  • Are there plans to add major appliances or electric vehicles?

Installing more panels than needed ensures all your current and future energy needs will be met.

With your usage data and our panel output expertise, we can determine the optimal solar array size and configuration for your home. Contact us to get started designing a system tailored to your energy consumption.

VII. Installation Considerations

To successfully install oversized solar panels, some key factors must be addressed:

Measure Roof Space

  • Clearly outline usable roof sections at proper tilt angles
  • Consider spacing needed between panels and around edges

This ensures adequate room for safe installation.

Evaluate Roof Load

  • Calculate total system weight including panels, mounts, and hardware
  • Assess roof structure and reinforcement needs

This guarantees the roof can support the system’s load.

Determine Panel Orientation

  • Arrange panels for optimal sun exposure
  • Adjust orientation between landscape and portrait as needed
  • Ensure accessibility for cleaning and maintenance

The right layout maximizes energy generation.

Leave Access Paths

  • Map safe paths between array sections for installation and cleaning
  • Avoid skylights, vents, chimneys, and other roof features

Access paths protect the roof and allow system maintenance.

Considering these factors results in a safe, optimized rooftop solar installation. Contact us to survey your roof and plan panel placement.

Learn More

VIII. Improving Panel Efficiency

While most panels operate between 15-20% efficiency, new technologies are pushing those limits even higher.

Emerging Solar Panel Materials

  • Perovskites – Thin, low-cost films with efficiency over 25%
  • Organic PV – Carbon-based panels exceeding 13% efficiency
  • Quantum dots – Nanocrystals that enhance energy generation

Passive Cooling Techniques

  • Aluminum frames, anti-reflective coatings, and backsheet fins help dissipate heat
  • Cooler panels can operate closer to peak efficiency

Active Cooling Solutions

  • Hybrid panels with heat pipes or liquid coolants maintain optimal temperature
  • Some active cooling panels exceed 30% efficiency

Single-Axis Tracking

  • Panels on motorized mounts follow the sun throughout the day
  • Tracking boosts energy generation by 20-30%

While commercial panels top out around 22% efficiency, new designs and innovations will continue pushing that threshold higher. Contact us to leverage the latest solar technologies for your installation.

Mono Rail System

Mono Rail System

Mono Rail System

I. Introduction

The Mono Rail System is an optimized mounting structure designed for easy installation of solar panels on metal roofing. Some key highlights include:

  • Lightweight frame made using aluminium and SS 304 materials.
  • Optimized low-profile shape with the minimal wind resistance.
  • Allows high capacity installation of solar panels.
  • Easy installation and maintenance.
  • Panels arranged in portrait orientation.

Properties

AttributeDescription
OrientationPortrait
Crest Width CompatibilityFits any trapezoidal sheet
Panel CompatibilityWorks with all PV module brands
Wind Speed DurabilityUp to 200 kmph
FinishAnodized or non-anodized

The streamlined mono rail dimensions make it a cost-effective solution:

  • Height: 70mm
  • Length: Customizable based on crest-to-crest distance
  • Easy Installation
  • The mono rail system is designed for rapid mounting
  • Rivet and tape attachments between rail and roof
  • U-clamps and mid-clamps to secure panels to rail
  • Non-penetrative adhesive options available
  • Adjustable layout to accommodate high capacity

With lightweight aluminium parts, customizable dimensions, and easy installation, the Mono Rail System enables high solar panel capacity on metal rooftops while minimizing costs and labour.

II. Design Properties

Structura Metal provides a Mono Rail System has an optimized structure to effectively mount solar panels in a portrait orientation on trapezoidal metal roofs. Some key design properties include:

  • Compatibility with any crest width.
  • Suitable for a wide range of solar panel thickness:
  • 30mm
  • 35mm
  • 40mm
  • Cost-effective while maintaining quality
  • Durable performance in high wind speeds

Material Properties

Constructed using highly weather-resistant materials:

  • Aluminium alloy 6063 T6
  • Lightweight
  • Corrosion-resistant
  • Structurally rigid
  • SS 304 Stainless Steel
  • Strong and hard-wearing
  • Excels in tough environments
  • EPDM rubber tape
  • Flexible
  • Waterproof
  • Excellent adhesion

Structural Specifications

AttributeDimension
Height70mm
LengthMatches crest-to-crest length

Mounting Components

  • U-clamps and mid-clamps attach panels.
  • Z clamps connect rail ends.
  • Durable rail nuts and bolts interface parts.
  • Rivets anchor rail to roof.
  • With robust materials and structural data validation, installers can have confidence in the mono rail’s resilient mounting capacity and cost-effective roof integration.

III. Mono Rail Fixations

Mono Rail Fixations

The mono rail securely mounts to the roof and panels through specially designed fixations.

Rail to Roof

The rail attaches directly to the metal roofing using:

  • Rivets – Drill and anchor rail to roof.
  • EPDM tape – Create waterproof seal.
  • Adhesive – Bond rail for non-penetrative option.

This allows a tight fit to match the trapezoidal sheet while sealing against the elements.

Rail to Panel

Solar panels interface with the rail via:

  • U-clamps – Grip frame edges.
  • Mid-clamps – Attach to centres of frame.

These clamps cradle the panel to account for thermal expansion and contraction while providing:

  • Strength
  • Support
  • Adjustability

Fitting Range

The mono rail’s module clamps accommodate various panel thicknesses:

ThicknessPanel Compatibility
30mmMost frame types
35mmMany frame types
40mmMany frame types

This flexibility allows installers to mount a wide range of solar panel brands and models to achieve high capacity.

The innovative mono rail fixations provide versatile, cost-effective mounting on any metal roofing through secure anchoring and adjustable panel support.

IV. Dimensions & Materials

Dimensions & Materials

The mono rail is constructed using durable metals and rubbers to exact structural specifications.

Dimensions

  • Height: 70mm
  • Length: Customizable
  • Matches trapezoidal sheet crest-to-crest distance
  • Allows installation along entire metal roof

Metals

  • Aluminium Alloy 6063 T6
  • Lightweight
  • Corrosion-resistant
  • Easy fabrication
  • Stainless Steel 304
  • High strength
  • Hard-wearing
  • Excellent weather ability

Rubber

  • EPDM Tape
  • Flexible
  • Waterproof
  • UV/ozone/heat-resistant

Other Materials

  • U-clamps
  • Mid-clamps
  • Rivets
  • Rail nuts
  • Spring washers

Technical Specifications

AttributeRating
Wind SpeedUp to 200 kmph
Roof Clearance100mm spacing

With strategically designed dimensions and durable construction materials, in Structura Metal the mono rail provides reliable mounting and weather resistance to safely install solar panels in demanding environments.

Click Here to Learn More

V. Manufacturer Information

Structura Metal specializes in affordable mono rail systems while delivering quality products and timely order fulfillment.

Offerings

As an established manufacturer, Structura Metal provides the full range of mono rail mounting components:

  • Aluminium base rails
  • Stainless steel bolts
  • End clamps and mid clamps
  • Rivets and rail nuts
  • EPDM tape
  • Spring washers

Commitments

Structura Metal focuses on providing:

  • Cost-effective solutions
  • Low-cost
  • High-value
  • Customized systems
  • Fits project requirements
  • Accommodates metal roofing
  • Ready stock
  • No shortages
  • Quick shipping
  • Rapid delivery
  • High order capacity
  • Large project expertise

Production & Testing

  • In-house manufacturing
  • Tight quality control
  • Efficient processing
  • Dimensions matched to crest width
  • Material integrity testing
  • Pre-dispatch inspections

As an established mono rail specialist, Structura Metal delivers reliable, ready-to-install systems at affordable pricing to meet large project demands.

VI. Why Choose Mono Rail

Mono Rail

The mono rail system simplifies solar panel installation with its intelligent mounting design. Here are key reasons to select mono rail:

Durability

  • Wind resistance up to 200 kmph.
  • Durable metals and rubber.
  • Corrosion and weather-resistant.
  • Long-lasting performance.

Adaptability

  • Fits all metal roof crest widths.
  • Compatible with any solar panel thickness.
  • Customizable length as per the project.
  • Securely anchors roof and panels.

Reliability

  • Rigorously tested.
  • Verified structural integrity.
  • Pre-dispatch quality checks.
  • Proven in tough environments.

Support

  • Ready-to-install system.
  • Complete mounting components.
  • Easy installation process.
  • Large order expertise.

Value

  • Cost-effective, affordable systems.
  • High capacity installation.
  • Comprehensive warranties.
  • Maximizes project ROI.

With intelligent design and rigorous verification, mono rail simplifies secure and reliable solar panel mounting to reduce project costs and risks.

Solar Flat Roof Mounting Systems

Solar Flat Roof Mounting Systems

Solar Flat Roof Mounting Systems

I. Introduction to Flat Roof Solar Mounting Systems

The “Structura Metal” provide installing solar panels on flat roofs is becoming an increasingly popular option for both homes and businesses looking to be utilize renewable energy. Flat roofs provide ample vacant space for mounting solar PV systems and solar thermal panels. While pitched rooftops can also accommodate solar arrays, flat roofs offer some unique advantages.

1.     Benefits of Flat Roof Solar

  • More flexibility in panel orientation and tilt angle for optimal sunlight capture
  • Ability to install larger solar arrays more easily
  • Less visibility of panels from street level

2.     Types of Flat Roof Mounting Systems

There are two main types of solar mounting systems used on the flat roofs:

  • Free-standing/Ballasted: Panels are fixed onto frames and weighted down without penetrating the roof
  • Attached/Penetration: Panels are anchored to rails attached directly to the roof surface

Ballasted systems avoid compromising the integrity of the waterproof roof membrane. However, attached systems typically withstand higher wind loads.

3.     Flat Roof Solar Panel Options

System TypeDescriptionConsiderations
Solar PVConverts sunlight into electricityRequires wire connection to building
Solar thermalHeats water from sunlightIntegration with hot water system

“Structura Metal” gives a proper site evaluations and safety precautions by qualified solar professionals are crucial when installing panels on flat roofs. Key factors like roof strength, panel wind resistance, and placement optimization should be addressed during the planning process.

With smart design and strategic mounting selections tailored to the specific roof, flat spaces can be successfully transformed into the efficient solar hubs. Flat roof solar offers property owners a versatile platform to harness renewable energy.

II. Key Considerations for Flat Roof Solar

Installing a solar system on a flat roof requires careful planning and preparation to ensure optimal performance and safety. Here are some of the most important factors to consider:

A. Roof Structure and Condition

  • A structural assessment is vital to verify the roof can handle the additional weight of solar panels and mounting systems
  • The roofing material and age impacts the choice of mounting method
  • Reinforcing the structure may be necessary for older or weaker roofs

B. Orientation and Panel Tilt

  • Optimal tilt angle depends on the latitude and climate
  • Angled mounts typically used to maximize solar gain
  • Adequate spacing prevents inter-row shading

C. Weather Resistance

  • Wind resistance varies by mounting type:
SystemWithstands
BallastedUp to 100 mph
AttachedOver 110 mph
  • Snow load capacity also factors into structural requirements

D. Accessibility and Maintenance

  • Walkways facilitate safe access
  • Sufficient clearance eases system upkeep and repair
  • Cabling should be neatly managed

Careful flat roof solar design to optimize the energy generation and safeguards the roof’s integrity. Consult closely with qualified solar professionals during the process.

III. Residential Flat Roof Solar Solutions

 Residential Flat Roof Solar Solutions

Homeowners with flat roofs made of materials like concrete, membrane, tar and gravel, or torch down have several good solar mounting options. Residential flat roof solar systems allow households to generate their own clean energy through photovoltaic panels or solar water heating.

A. Solar Panel Mounting Methods

SystemDescription
Non-penetratingNo roof holes, relies on ballast weight
PenetratingAttached with roof fasteners

B. Non-Penetrating Ballasted Mounts

  • Ballast mounts secure panels without penetrating roof
  • No risk of leaks or voids in roof warranty
  • Concrete blocks or gravel often used as ballast

This is the fastest and simplest residential flat roof solar installation method. However, snow load capacity and wind resistance is lower than a penetrating system.

C. Concrete and Membrane Roofs

For poured concrete roofs or membrane waterproofing:

  • Attached penetration mounts may be preferred
  • Ensure proper flashing & seals around anchors

Proper structural support and weatherproofing is the key for roof health.

We consult a qualified solar pro to determine the optimal mounting solutions for your flat roof type and conditions. Careful design tailored to your roof ensures reliable, efficient solar array performance.

IV. Commercial Flat Roof Solar Solutions

Businesses with ample flat roof space are ideal candidates for large-scale solar arrays. Commercial sites allow for solar installations that can offset a significant portion of the building’s electricity usage.

A. Benefits of Commercial Scale Flat Roof Solar

  • Cost-saving through reduced utility bills
  • Enhanced sustainability profile
  • Increase property value
  • Easier emergency power integration

B. Types of Systems for Large Commercial Roofs

  • Expansive fields of angled solar PV panels
  • Solar thermal arrays for water heating needs
  • Options for attached and ballasted mounting

C. Specially Designed for Heavy-Duty Applications

Solar mounting systems made for commercial projects feature:

  • Capability to handle the large-format modern solar panels
  • Robust structural components
  • Withstand intense wind, snow etc.
  • Streamlined installation process

Maximizing sunlight exposure is the key through strategic panel placement and tilt optimization.

V. Local Regulations and Policies

In “Structura Metal” the installation of  solar panels on a flat roof is subject to various building codes, regulations, and construction policies depending on your jurisdiction. Navigating the relevant rules is key for smooth project execution.

A. Building Codes

  • Local statutory codes dictate structural, fire safety, wiring and the other requirements
  • Qualified solar professionals handle integration of code-compliant components

B. Planning Permissions

  • Planning permissions needed for:
  • Conservation or historic areas
  • Development approvals
  • Grid connection policies
  • Streamlined approval processes available in some areas

C. Homeowner Associations

  • HOA aesthetics rules may apply
  • Rooftop equipment restrictions to be consider

D. Incentives and Rebates

Many municipalities offer programs like:

  • Solar feed-in tariffs
  • Renewable energy rebates
  • Property tax exemptions

Confirm eligibility criteria before designing system.

Thorough research into local ordinances, utility policies, community rules, and incentive programs is strongly advised prior to installing. This ensures your flat roof solar project proceeds smoothly while conforming to all applicable regulations.

VI. Installation of Solar Systems on Flat Roofs

 Installation of Solar Systems on Flat Roofs
Professional technician installing solar photo voltaic panel to metal platform using screwdriver. Stand-alone solar panel system installation, efficiency and professionalism concept.

Installing the solar panels on a flat roof requires careful planning and execution to ensure optimal performance and safety. There are key considerations when mounting solar systems on flat roofs:

  • Structural integrity
  • Waterproofing
  • Panel orientation
  • Mounting system

A. Structural Integrity

The existing flat roof structure must be assessed to verify it can handle the additional weight of the solar array and mounting system. An engineer should conduct load calculations to determine:

  • Number of solar panels the roof can support
  • Weight of mounting system
  • Wind and snow load capacity

If needed, the roof can be reinforced to increase its structural capacity for the solar setup.

B. Waterproofing

With ballasted systems, waterproofing is less of a concern since they do not penetrate the roof membrane. However, non-penetrating mounts may still require flashing or seals around the attachment points to prevent the moisture issues. It’s vital not to be compromise the roof’s water resistance.

C. Orientation and Tilt

Optimal panel tilt for maximum energy yield:

RegionTilt Angle
Lower latitude10-20°
Mid-latitude15-25°
Higher latitude25-35°

Azimuth angle will vary by location.

Read More

D. Mounting System

Flat roof mounting system options:

  • Ballasted: Concrete blocks secure structure
  • Non-penetrating: Attached without the roof membranes penetration
  • Mechanically attached: Secured with the roof membrane penetration

An installer will be determine the ideal mounting based on climate, loads, and roof type. Proper installation is key for a long-lasting solar system.

Residential flat roof solar setups have unique needs versus large commercial projects. Always consult with qualified solar professionals.

VII. Electrical Components for Flat Roof Solar

 Electrical components for flat roof solar

Properly designing and installing the electrical system is critical for a functional and safeflat roof solar array. Key electrical components include:

  • Solar panels
  • DC wiring
  • Flat roof mounting system
  • Inverter
  • AC wiring

A. Solar Panels

  • Silicon photovoltaic cells generate DC electricity
  • Connected in series into strings

B. DC Wiring

  • Connects solar panels into strings
  • Plug-and-play MC4 connectors
  • Copper wiring sized for voltage drop

C. Inverter

  • Converts DC to AC power
  • Required for grid connection
  • Properly sized for your system’s total wattage

D. AC Wiring and Breakers

Safely delivers power:

  • From inverter to electrical panel
  • Through appropriate conduit
  • With adequately sized breakers

Considerations for flat roof solar:

  • Wire management for safety and neatness
  • Accessibility for maintenance
  • Protection from weather and pests

Consult an experienced solar installer to ensure proper electrical setup.


IX. Maintenance Needs for Flat Roof Systems

Regular maintenance is essential for the optimal performance and longevity of a flat roof solar system. Key maintenance tasks include:

A. Inspections

  • Annual check of all components
  • Check electrical connections are tight
  • Ensure no damage from weather/pests

B. Panel Cleaning

  • Dirt and dust reduce efficiency
  • Clean 1-4 times per year
  • Use soft brush and mild cleaner

C. Vegetation Management

  • Trim back nearby trees
  • Prevent excessive shading

D. Mounting Bolts

  • Check mounting bolts are tight
  • Tighten as needed

E. Waterproofing

  • Inspect water barriers around mounts
  • Repair flashing if damaged

F. Wiring

  • Replace cracked wire conduits
  • Flat roof mounting systems make panels accessible. Best practice is to create walkways between panel rows for easy maintenance.
  • For commercial roofs, regular maintenance improves system performance over a 20-30 year lifetime. Consider a maintenance contract when installing solar.

X. Cost Savings From Flat Roof Solar

Installing a flat roof solar system represents a significant upfront investment, but the long-term savings can make it financially worthwhile:

  • Solar panels have a useable lifespan of 25-30 years
  • Savings from reduced electricity bills continue over system lifetime
  • Payback period typically 4-8 years

Other cost savings:

  • State/federal tax credits and solar incentives
  • Low maintenance costs
  • Increased property value

ROI is maximized with high system efficiency through:

  • Optimal flat roof mounting
  • Proper panel orientation
  • Quality components
  • Regular maintenance

For proper guidance Structura Metal provide a solar professional to evaluate potential energy cost savings from a flat roof solar system specific to your property.